How to transplant orchids correctly
It is, without a doubt, one of the tasks related to these plants that arouses the most doubts. How to transplant orchids is a task that is not very difficult, but it has its peculiarities. Because just as important as knowing how to carry it out successfully is knowing other extremely important details so that changing the pot does not harm our plant.
As much as transplanting may seem like an unimportant task, nothing is further from reality and less so in the case of orchids. As with other houseplants, repotting should not be done lightly. It is not only important to know how to transplant a plant correctly, but also to understand that changing the substrate and pot can be harmful to it. It is not only important to choose the right moment. It is also essential to follow a series of guidelines so that our plant suffers as little as possible.
So let’s see what we need to know to transplant orchids. A task that will allow us to improve the growth of our plant, clean it up or even solve any of the orchid diseases that may arise.
THE FIRST STEP: WHEN TO TRANSPLANT ORCHIDS
An essential detail. Just as important as knowing what steps to follow to transplant orchids is knowing when is the ideal time to carry out this task. An aspect that we must consider from two points of view.
The first and most logical: what is the best time of year to transplant orchids. Something that happens to know the vegetative cycle of these plants. Its growth season par excellence is spring, when temperatures begin to settle steadily between 15 degrees during the day and 10 at night. For our transplant to be successful and not affect the growth of the plant, we will have to move it in the last weeks of winter. Failure to do so could directly affect its flowering.
And on this, let’s bust a myth: transplanting a blooming orchid is not a good idea. It is highly likely that you will lose them all.
In addition to the time of year, what else to take into account?
We have already seen that timing is important, but it is not the only thing to consider. As we said, transplanting orchids responds to very specific reasons that, in reality, are the ones that justify this change of pot and substrate.
Generally speaking, orchid transplants should be done once every two years. But, beyond this data, there are very specific reasons to carry out this task. The fundamental ones are:
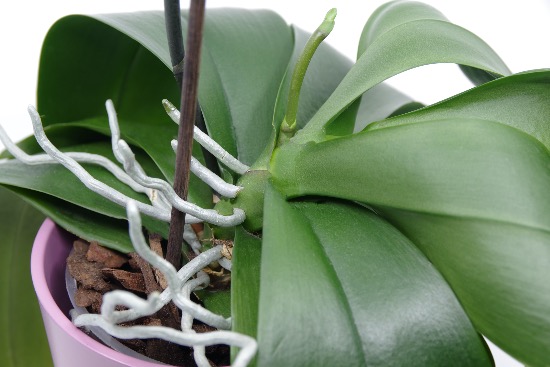
1. The roots protrude from the pot
One of the signs of growth of an orchid is its roots. If we detect that the aerial roots protrude a lot or that they even come out through the drainage holes, it is time to transplant.
2. The roots have no room to grow in the pot
Sometimes they do not protrude visibly, but if we look inside the pot, we see that they lack room to grow. Not only can this stifle them, but it also substantially stunts growth.
3. We detect brown roots or roots in poor condition
Root rot is one of the most common orchid diseases. When they appear, they are not just the result of poor irrigation. They can also be a source of infection that leads to the death of the plant, since it is still how a fungal infection manifests itself.
4. The substrate has compacted and does not drain properly
Another important reason to consider the transplant. The danger of excess watering in orchids translates, as we said in the previous point, into a fungus problem. This is not the only reason: over time, the substrate stores mineral salts and other elements from both the water and the different types of fertilizers. Far from being beneficial, they can be detrimental to the growth of our plant.
If we see that watering our plant does not drain the water correctly, it is time to change the substrate and the pot.
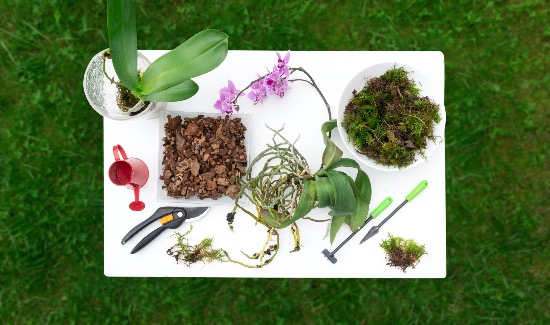
STEPS TO TRANSPLANT ORCHIDS
Understanding the when, it is time to know the how. As we said, transplanting orchids is not a difficult task, but it does require taking into account important aspects. And not only for it to be successful: also because, only by doing it correctly, we will make it benefit our plant in its growth and flowering.
So, let’s see the essential steps for this work.
1. Sanitize the roots, eliminating the diseased and dry ones
It is, perhaps, the most delicate step when it comes to transplanting orchids. And not because removing roots in poor condition is complicated, but rather because this much-needed task means that both our hands and the utensils we use are clean, disinfected and in perfect condition. For this, the ideal is that we use alcohol.
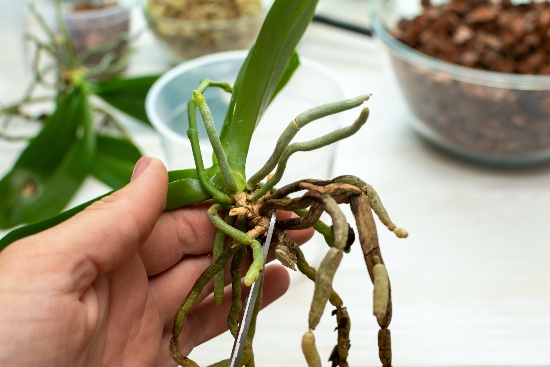
The objective of this work is to eliminate dry, brown and bad roots. A task that begins by removing all the old substrate, taking special care when removing the pieces that may have remained stuck to the roots. With them completely clean, it’s time to start cleaning up. To cause the least possible damage to the plant, we will have to make firm and clean cuts, always as close as possible to its base.
2. Prepare the pot with good drainage and suitable substrate
Let’s start with the pot. Beyond choosing a transparent one, essential for the roots to receive the light they need to grow; it is important that we choose a slightly larger one than the previous one. Although we think that a much larger pot is positive for our plant, it does not have to be. The ideal is that our plant has more space but without excesses.
It is also important that the transplant pot is clean. If we reuse it from another plant, we will have to wash it thoroughly and remove any traces of soap before planting it again.
In addition to the substrate, it is also important to provide our plant with good drainage. Although we can use expanded clay balls, we can also use other amendments that do not hold moisture.
3. Place our plant in its new location
It is the crucial moment in the transplantation of an orchid. With our drainage layer created, we will lay down a small layer of orchid substrate to serve as a base. The size of this layer will depend on both the height of the pot and the roots of our plant. The idea is that it supports the roots, allowing the aerial part of the orchid to be flush with the edge of the pot.
The next step is to place our plant inside the pot. We will fill the gaps by introducing the substrate, always trying not to touch the roots with our hands. To help compact it, simply move the pot sideways.
4. Postponing watering for a week
An important precaution. Having healed the roots, it is essential to temporarily stop watering. If not, those much-needed cuts can become a source of disease for the plant.
As important as this is not to modify the conditions of our plant before transplanting. One of the peculiarities of caring for orchids is that, if we find a place where our plant grows and flourishes, the ideal is not to change it. If it is an unwritten rule in general, it must become an absolute maximum after a transplant.
We hope that with our advice you have lost your fear of transplanting orchids. And, if you have any questions, do not hesitate to write to us through social networks!

![Photo of The 10 Most Beautiful Air Plants [Features and photos]](https://www.complete-gardening.com/wp-content/uploads/2022/08/the-10-most-beautiful-air-plants-features-and-photos-390x220.png)